joyeux cuisine

a blog about good food, family, friends, and life.

an award?! and celebration cookies.

I’m new to the blogging world, but I’ve gotten so much encouragement from people all over that it makes my heart happy. One such event occurred a couple days ago after Terri, from Terri’s Kitchen gave me (or nominated me for) The Very Inspiring Blog Award! I don’t even know what that means and I’m super grateful and encouraged by it! Thank you so much, Terri!

By receiving this award I am supposed to do a few things:

  • Display the award logo somewhere in the post
  • Link back to the blog of the person who nominated me
  • State seven things about myself
  • Nominate 15 other bloggers for the award (so…I’m only doing 4 because I don’t know 15…I tried, I really did)
  • Notify those bloggers of their nomination and let them know the award requirement

So those who I am nominating for this:

And now for seven fun facts about myself:

  • I’ve been knitting for almost 11 years and love it.
  • I’m secretly a super nerd and love all things Star Wars, Lord of the Rings, etc.
  • I have no idea what I want to do with my life and that scares me a little bit.
  • I find that the beach is a lovely place to be.
  • I’m a super bookworm and am always in search of awesome books
  • I love my cat. Her name is Coda (see right)
  • I made cookies for this occasion because everything is better with cookies. Fact. See recipe below.

I’ve had a Funfetti cookie mix in my pantry for forever and didn’t know what to do with it until now. Sandwich cookies!! Why didn’t I think of this before?! This is a super easy recipe and these are perfect for birthdays, random get-togethers among friends, or just to celebrate life. Those are the best times.

I have one rule. Do not use canned frosting. Seriously. Just don’t do it. It isn’t worth it and there are better things in life. Making your own frosting is simple and way better tasting. I guarantee it! I’m going to share with you my secret frosting recipe. If frosting is needed, this what I make. All my friends know if they get cupcakes for their birthday, they will have this frosting on top. They seem to be okay with it. I will eat this with a spoon it is so good. And it’s really simple too. Just a few ingredients and it’s complete. And you will have all of these in your pantry, so it’s a win-win.

You need an even number of cookies for this, so if you end up with an odd number and have to eat one I won’t tell anyone. These cookies are out of a box, so they are super easy to make. Just try to make every one the same size when you put them on the cookie sheet so that you won’t have to mix and match to find two that are the same size. It’s quite a time saver.

I thought I could mix this all together with a wooden spoon, but apparently I haven’t been to the fitness center quite enough and had to use my electric mixer. Things worked out in the end though. And these cookies turned out wonderfully. Underbaked just enough so they’re chewy and the frosting ties it all together. Oh my, oh my. Kids will love these as well because what kid doesn’t like a sandwich cookie? It’s like a birthday cake in a cookie! Perfect! So, I encourage you to make these cookies, share them, and then then listen to Mozart’s oboe concerto in C. Or just try and memorize it…because that’s normal.

Confetti Celebration Cookie Sandwiches

makes approx. 16 cookie sandwiches

for the cookies:

1 box Funfetti cookie mix

1/2 cup butter, softened

1 egg

for the frosting:

1/4 cup butter, softened

1 egg white

2 cups powdered sugar

flavoring of your choice (the amount will vary depending on what flavoring you choose)

food coloring of choice (I attempted a turquoise, so I used blue and green)

Preheat the oven to 375 degrees. Line a cookie sheet with parchment paper. Combine cookie mix, butter, and egg in a medium sized bowl and mix until the dough forms. Scoop 2 inch balls onto the cookie sheet, being careful to make them the same size. Bake for 8-10 minutes or until the edges are browned. When cookies are baked, allow to cool on the cookie sheet for about 3 minutes then transfer to a wire cooling rack. Continue baking until all the cookie dough is used up. While the cookies are cooling mix the frosting. In a medium sized bowl combine butter, egg white, and 1/2 cup powdered sugar and mix with an electric hand mixer until well combined. Continue adding the powdered sugar 1/2 cup at a time until all the powdered sugar is used up. Scrape down the sides of the bowl as necessary. Add in the flavoring and mix. Add food coloring and mix well. When cookies are cooled, spread frosting on the bottom of one cookie as thick or thin as you prefer. Place another cookie on top with the bottom on the frosting. Repeat until all the cookies are used up.


If you have extra frosting, store it an airtight container in the fridge. Loosen it up with a little bit of hot water when you want to use it again.

These cookies will last in an airtight container for 3-4 days. I suggest storing them in the fridge, but they’ll be okay at room temperature too.

Thank you again Terri!!

Leave a comment »

peanut butter chocolate chip cookies

This weekend two of the most awesome people I know got married and I’m so glad that I got to be in attendance. It was a really big party for friends to get back together and celebrate marriage and life. Those two are great and they truly belong together. The wedding took place in Indiana and my brothers and I went over a couple days early. That means we’ve been eating out for about 3 days straight. This is not a good thing for anyone. I also didn’t get to bake for a little while. So I was itching to do some baking when we got back.

This led to searching through cookbooks and around the internet to find a good recipe. I was totally craving peanut butter and chocolate (it’s a weakness), and I found this recipe stuffed into one of my cookbooks. Similar to my brownies from a few posts back, but still different enough to be delicious.

Peanut butter chocolate chip cookies. Those words in the same sentence are excellent. This recipe has no flour in it. I think that’s a good thing. Maybe a little healthier? Yeah…I’m just gonna go with it. We start with peanut butter, white sugar, and brown sugar. This little trio of deliciousness gets whipped up nice and fluffy. Then all the other ingredients get tossed in and mixed together. It’s really simple and really worth it. It’s one of those one bowl recipes and I love how classic this is. Someday I’ll learn to branch out and make other kinds of cookies. Someday…

These cookies are really good with a glass of milk. Dipping is optional but highly encouraged. I have this thing about underbaking cookies…I do it all the time. There’s just something about a really chewy cookie that you have to love. There’s positives about crunchy cookies too, but chewy cookies are the way to go. In my humble opinion anyway.

Bake these cookies. And then go to sleep. It’s just the right thing to do.

Peanut Butter Chocolate Chip Cookies

makes 2 dozen cookies

1 cup peanut butter

1/2 cup white sugar

1/2 cup brown sugar

1 egg

1 teaspoon vanilla

pinch of salt

1 teaspoon baking soda

3/4 cup chocolate chips (milk or semisweet)

Preheat the oven to 350 degrees. In a medium sized bowl combine peanut butter and sugars and mix with an electric hand mixer until fluffy. Add in egg and vanilla and mix until combined. Stir in the salt, baking soda, and finally the chocolate chips. Roll into walnut sized balls and place on a cookie sheet lined with parchment paper. Smash down with a fork and create the criss-cross design. Sprinkle more white sugar on top. Bake for 8-10 minutes. Cool the cookies on the cookie sheet for about 3 minutes and then move to a wire rack to finish cooling. Serve while still warm.

Store cookies in an airtight container at room temperature. They will stay fresh for about a week.

3 Comments »

chocolate chip maple syrup pancake muffins

Right now I am obsessed with a few things. These things include: listening to The Civil Wars, watching How I Met Your Mother, knitting dinosaurs (more on that later), organizing, attempting to work out every other day, working, eating chocolate chips and French vanilla ice cream, reminiscing about Paris, and reading the blog and cookbook of Joy the Baker (she’s my favorite) and baking as many things as I can. That one’s normal though.

This book is the bomb. I got it for my birthday this year and promptly read the entire thing. I also got to meet Joy at her book signing in Chicago in April and it was awesome. You know when you meet someone you really admire (and happen to share a name with?!) and you don’t even know how to react? Yeah…that happened. (I would share the picture of the two of us together, but I look really awkward, so we’ll save that for another time.) Anyway, I highly recommend this book for bakers everywhere.

This recipe is from Joy’s blog. She has so many good recipes and it’s really fun to make her stuff. So. I found this recipe and decided to make it to take to work in the morning. Super user friendly. Recipes that don’t involve an electric mixer are awesome. This one’s just a couple bowls, a saucepan or two, and a whisk. Super awesome. Don’t be intimidated by the title. It sounds really complicated, but it really isn’t. I super promise (that’s better than a regular promise).

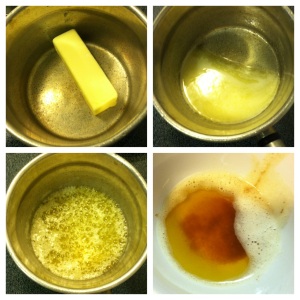
We’ll start with the browned butter. Browning butter adds a rich flavor to foods, especially cookies and muffins. For this you NEED to use real butter. No margarine, no “I Can’t Believe” stuff. Real butter. Just believe me. To begin, put butter in a small saucepan over medium heat (picture 1). Butter will melt (picture 2). After it melts, the butter will start to crackle and foam up. Then it will bubble a lot (picture 3). Don’t leave it alone at this point because it can brown really fast from here on out. After the crackling dies down, the fats in the butter will turn brown and it will smell really nutty. Remove from heat and place in a bowl to cool a little bit before using the butter in the recipe (picture 4). This process will take between 8-10 minutes, theoretically. Sometimes it takes longer, sometimes not. This sounds really scary and you may think you’re going to burn the butter, but don’t worry. It isn’t. And it adds tons of flavor.

These muffins are full of maple syrup flavor, making them really good for breakfast. But I just ate ice cream before I ate dinner so I’m pretty sure that’s not exclusive. This batter is really good and pretty simple. It’s the kind of thing that isn’t too dense but still allows for room for flavors to blend. I added chocolate chips to these because it seemed like a good idea. Why not?

These get baked up and the chocolate melts a little bit. There really isn’t anything better than that right now.

Now, these are good, but it gets even better. A maple syrup glaze. Guys. This is the best. It adds even more maple flavor to the explosion of deliciousness in these muffins. I really hope you make these. And then finish watching season seven of How I Met Your Mother. Well…that’s just what’s gonna happen in my life right now.

Chocolate Chip Maple Syrup Pancake Muffins

from Joythebaker.com

makes 12 muffins

For the muffins:

7 Tablespoons unsalted butter

1/3 cup milk (go 2% or whole)

1 large egg

1 large egg yolk

1 Tablespoon maple syrup

1 teaspoon vanilla extract

1 and 1/2 cups flour

3/4 cup sugar

1 and 1/2 teaspoons baking powder

3/4 teaspoon salt

1/2 cup mini semisweet chocolate chips

For the glaze:

3/4 cup pure maple syrup

1 Tablespoon lemon juice

Preheat the oven to 375 degrees. Line cupcake pan with cupcake liners. Brown the butter in a small saucepan. When brown, set aside to cool. Whisk together milk, egg, egg yolk, syrup, and vanilla. Stir in the browned butter. In another bowl whisk together flour, sugar, baking powder, and salt. Add the milk and butter mixture to the flour mixture all at once. Stir to combine. Once combined stir in chocolate chips. Divide between the cupcake liners and bake for 18-20 minutes or until a toothpick inserted into the center of the muffin comes out clean. While the muffins are baking make the glaze. Simmer syrup and lemon juice in a small saucepan over low to medium heat stirring occasionally. Syrup will reduce and become thicker. Remove the glaze from heat. When muffins are done baking, let them cool for 5-6 minutes, or until you can handle them. Poke some holes in the top with a toothpick and dip the tops in the glaze. Repeat for each muffin and when all have been dipped dip them a second time, starting with the first muffin dipped. Allow to cool completely on a wire rack.

These muffins will last in an airtight container at room temperature for 7-10 days.

Leave a comment »

six layer bars

Summer is a time for fun. And for delicious things. One of those delicious things is toasted coconut. There is absolutely nothing wrong with toasted coconut. Combine toasted coconut with 2 different kinds of chocolate and you are golden. These are the days of deliciousness, my friends.

These bars are so good. They’re perfect for pool parties, get togethers, and even just sitting in the air conditioning. It’s been really warm the last few days, it’s just going to happen. There’s so much sweetness that 1 bar is plenty, but it’s that sweetness that will have you craving more. Don’t try and fight it. It’s inevitable.

This recipe starts with graham crackers and butter. You really can’t go wrong with these two things. I like to crush up graham crackers the old fashioned way: rolling pin and plastic bag. It’s a good way to let out some aggression and de-stress. I highly recommend it.

Toast up some shredded coconut in the oven and layer semisweet chocolate chips (or if you’re like me and forget that semi-sweet chocolate chips are the only kind you don’t have, chop up some bakers chocolate. it’s pretty much the same), white chocolate chips, and butterscotch chips. This is where it starts to look really delicious.

Can’t you just imagine how delicious this is going to be? Don’t worry it gets even better. And sweeter. I know! Just when you thought it couldn’t get more unhealthy. A whole can of sweetened condensed milk gets poured all over these. So rich.

Bake these and slice them. Okay. Now you’re done. I’m really sorry about these. They’re delicious and really unhealthy. My solution to this problem is to give them away. You make a lot of friends by giving them free food. Especially desserts. That way, you don’t have to eat them all. Always a bonus. Happy summer, everyone!

Six Layer Bars

adapted from browneyedbaker.com

makes 1 9×13 pan, about 12 bars depend on size

1 cup sweetened shredded coconut

8 Tablespoons (1 stick) unsalted butter

9 graham crackers crushed

1 cup semisweet chocolate chips

1/2 cup white chocolate chips

1/2 cup butterscotch chips

1 (14 oz) can sweetened condensed milk

Line a 9×13 pan with foil or parchment paper leaving edges to act as handles and liberally spray with cooking spray. Preheat the oven to 350 degrees. Spread the coconut on a cookie sheet and bake until the edges turn golden brown, about 4-5 minutes. Keep an eye on it though, coconut can burn really quickly. Melt the butter and combine it with the graham cracker crumbs. Mix the butter and crumbs until the butter is distributed through the crumbs. Press into the bottom of the pan. Layer in order: semisweet chocolate chips, white chocolate chips, butterscotch chips, and coconut. Pour the sweetened condensed milk over the entire pan. Bake until the top is golden brown, about 20-25 minutes. Cool in the pan on a wire rack to room temperature. Once cool, remove the foil or parchment from the pan with the handles. Slice into bars.

These will last at room temperature, well wrapped for up to a week.

Leave a comment »

Father’s Day. And Blueberry Crisp.

(this is the post where I brag about my dad because he is really great and because it’s Father’s Day)

My dad is awesome. Don’t get me wrong, both my parents are really great, but in honor of Father’s Day, he gets this one. He’s the reason I’m studying music because he’s a pretty boss trombone player and band director, which really inspired me. He’s also a pretty decent golfer (I didn’t inherit that trait, but both my brothers did so that’s something). My dad loves the Michigan Wolverines, Detroit Tigers, and (sometimes) the Chicago Cubs. He’s also got some pretty good kitchen skills. He makes a mean coffee cake and some pretty good blueberry crisp (hence, this post).

My dad grew up in Michigan and that side of the family still lives there, so for as long as I can remember we go pick blueberries in Michigan during the summers. Almost every summer. I used to hate it. But really, it’s pretty cool. My family believes that all Michigan fruits are superior to fruits from other states. Traverse City cherries and Michigan blueberries are both pretty delicious. I guarantee that we still have bags of blueberries in our freezer from last year. They’re just that good.

This year I can’t be home for Father’s Day. So instead I’m making a blueberry crisp in honor of my dad and that fact that he loves his blueberry crisp. Unfortunately, I don’t think Michigan blueberries are in season right now so I had to make due with regular blueberries (don’t tell my parents) and it still turned out wonderfully! I promise.

This recipe is actually really simple. It isn’t the same one my dad always uses because I don’t have that one yet. I’ll get it sometime. But really, you can whip this up really quick and have enough for 5-6 people depending on how much you like to share.

The outside topping part of this is stinkin’ delicious. It’s not too heavy and doesn’t over power the berries. Perfect. (Make sure you mix this in a large-ish bowl or you may end up getting flour all over your roommate’s kitchen chair…hypothetically speaking of course…)

See all the butter chunks? Delicious.

The berries in this get paired with sugar to bring out the juices and all the good flavor. This also helps to break down the berries a little bit before going in the crisp.

These delicious groups get layered on top of each other with the berries sandwiched in between two helpings of topping. The spices in the topping bring out all sorts of delicious flavors. So good. And when this is in the oven, the smells are ridiculous. For real. Ridiculous. And you have to eat this with a large helping of French Vanilla Ice Cream that’s sitting in your freezer for no apparent reason. It’s just life. Enjoy it. Happy Father’s Day!!

Blueberry Crisp

Recipe from Amanda Wright at whitandwhistle.com

Makes 1 8×8 pan

2 cups blueberries

2 Tablespoons white sugar

1 cup rolled oats

1 cup flour

3/4 cup packed brown sugar

1/4 teaspoon nutmeg

1/2 teaspoon cinnamon

3/4 cup butter (that’s 1 and 1/2 sticks) cold and cut into smaller pieces

Preheat the oven to 350 degrees and place a rack in the upper-middle portion of the oven. In a small bowl combine white sugar and blueberries. Set aside. In a medium-large bowl stir together oats, flour, brown sugar, nutmeg, and cinnamon. Cut in the butter with a pastry cutter until the mixture is crumbly. Press half the flour mixture into an 8×8 pan, pour the blueberries on top and spread evenly, then sprinkle the rest of the flour mixture on top of the blueberries. Bake for 25-30 minutes until the top is golden brown and the berries are bubbly. Serve warm with ice cream.

This crisp will last at room temperature for up to 4 days.

Leave a comment »

Lasagna Rolls

This summer, I decided to stay at school in Illinois instead of going home to Iowa where I hail from. I am totally okay with this because I have a sweet job here and love having this independence (sorry, Mom!). This comes with one large drawback: no home cooked food. This recipe is here to remedy that!

I love lasagna. Heck, I love Italian food in general. There is definitely something delicious about pasta, cheese, and tomato sauce. I don’t know what it is, but combine all those things together and you get some pretty nice dinner. This is also a really good meal to have friends and neighbors over and make good memories with old friends and make new friends. People seem to be more in the mood to chat over garlic bread and lasagna.

I found the idea for this recipe on Pinterest but decided to change it up and make it a little different. If you haven’t checked out Pinterest, it is probably one of the best ideas ever. I mostly like to browse on it while watching Netflix and eating handfuls of white chocolate chips. Yeah, that’s real life.

The original recipe called for chicken in the rolls, but I have decided that chicken and lasagna go better when there is Alfredo sauce involved. So I decided to use ground beef instead. You can also use no meat for your vegetarian friends, which also happened tonight. Half and half. I’m a fan. We start with sauteing garlic and beef. Pretty simple. But wait until the cheese happens.

Check out that cheesy goodness, friends.

Three kinds of cheese: Ricotta, mozzarella, and Parmesan. So good. (If you’re adding meat, this is where it goes) This mixture gets spread on cooked lasagna noodles and rolled up. Super fun. This should happen while you listen to sweet music, say Simon and Garfunkel’s Greatest Hits. It’s pretty chill.

As much as you can fit. So worth it.

Let’s be real, these are pretty adorable.

These get placed into a baking dish to sit in some sauce and soak up some of those flavors. This means that you have to pick a really good sauce. Not necessarily expensive or fancy, just choose a sauce that you like and that you are comfortable with and it’ll all work out. What else could we put on top of these? More cheese? Yes. I like the way you think.

This gets more delicious as we go.

This will get baked for a little bit to warm them up and melt all that cheese. This is a really good time to break out the garlic bread and heat that up too. This recipe makes 12 rolls, and you could put all of those in one 9×13 casserole dish to bake, or if your kitchen isn’t quite as well stocked with casserole dishes as you would hope, 2 8×8 dishes also work well.

Ready to be devoured.

This is also an easy recipe to half or multiply, so don’t be afraid to do so for fewer or more people.

Lasagna Rolls

(adapted from ivillage.com)

Makes 12 rolls

1 lb ground beef

1 clove garlic, minced

1 teaspoon dried oregano leaves

1 cup Ricotta cheese

1 cup mozzarella cheese

1/3 cup Parmesan cheese

1/3 cup milk

1/8 teaspoon black pepper

12 lasagna noodles, cooked and drained, cooled slightly so you can handle them

2 cups favorite spaghetti sauce

In a medium sized skillet saute garlic in a tablespoon of olive oil for 1 minute or so. Add in ground beef and and cook until brown.  Add oregano when beef is almost all the way cooked. Drain the meet and set aside to cool. In a medium sized bowl combine milk, cheeses, and pepper. Add the cooled meat to the cheese mixture and mix together. Pour 1 and 1/2 cups of sauce in to the bottom of the pan (divide among pans if using two). Take one noodle and spread the cheese mixture along the length of the noodle, leaving a half inch on each end to make rolling easier. Roll up the noodle and put seam side down in the sauce in the pan. Repeat that for all the other noodles. Pour the remaining sauce over the tops of the rolls and top with extra mozzarella and Parmesan. Cover with foil and bake for 30 minutes at 350 degrees. Serve with garlic bread.

If you have leftovers, keep them well wrapped in the fridge for up to 7 days. But you should eat them before that. Don’t let that cheese go to waste.

Leave a comment »

A Beginning. With Brownies.

So here we are. The summer of 2012. I’ve finally done what I’ve been saying I’ve been going to do for awhile: starting a food blog. But there’s so many food blogs on the internet that I am determined to make this one different.

I want this to be a blog about how food brings people together and how no matter how far you are from where you call home or who you call your family, food can always take you back there.

There will be recipes here. There will be stories here. There will be lots of emotions here (just can’t help it sometimes). There will successes and failures here. But mostly there will be food and happiness.

Let’s start with brownies. A very good place to start.

Allow me to introduce you to two of my favorite foods: chocolate and peanut butter. These are probably your old friends too, but put these two ingredients together in these brownies, and you will be in heaven. Or at least, pretty dang close. These are an old family recipe from my Great Aunt Cathy. She’s legit Dutch, and anything that comes from the Dutch has to be good, right? Right. (that’s the excuse I always use anyway…) We call them Batter Up Brownies, and to be perfectly honest, when I was younger these are what I considered brownies. Not chocolate brownies. I know, I know. A travesty. But seriously, make these and you will understand. I promise.

This is a normal recipe. It starts with flour, baking powder, and salt. Combine that with canola oil, eggs, sugar, peanut butter, and vanilla.

Before chocolate chips.

All those things are good, but then you add chocolate. Now I understand the different kinds of chocolate like semi-sweet, bittersweet, and the fancy ones that say 70% coco or something like that. These brownies need plain old milk chocolate though. The point of these is not to be fancy, its to be delicious and carefree. Don’t go too crazy here.

After chocolate chips. So good, friends.

Bake these delicious friends up and consume. Warning: these do not last long! My brothers and I can eat a pan in about a day and a half. My roommates and I have a good 3/4 of this pan gone and it hasn’t even been a day yet. Just be aware. I probably shouldn’t tell you this, but this batter is ridiculously delicious. Don’t be afraid to lick the beaters or spatula or bowl. You have total permission.

Perfect with a glass of milk. Seriously. Perfect.

Batter Up Brownies

Makes 1 9×13 pan

Ingredients:

1 cup flour

1/2 teaspoon baking powder

1/2 teaspoon salt

1/2 cup canola oil

3 large eggs

1 and 1/2 cups sugar

1/2 cup peanut smooth peanut butter

1 teaspoon vanilla

1 cup (give or take a 1/4 cup) milk chocolate chips

Preheat oven to 350 degrees and grease a 9×13 pan with oil/cooking spray

Measure flour, baking powder, and salt and combine in a small bowl. In the bowl of a stand mixture with the paddle attachment or in a bowl with an electric hand mixer combine oil, eggs, and sugar until well mixed, or about 2 minutes. Add dry mixture to the wet mixture and mix until combined, scraping down the sides of the bowl as necessary. Add the vanilla and peanut butter and mix. Stir in the chocolate chips. Pour into greased pan and bake for 25-35 minutes or until the top is golden brown and the brownies are set. Cool in the pan and consume quickly. With milk.

These brownies will last, in an airtight container, for about a week. But they probably won’t last that long. Just saying.

2 Comments »

CreativeWhimsy

A blog about one person's creative attempts

"Give a girl an education..."

The random musings of a traveler turned grad student.

Katina's Adventures Abroad

Follow my journey in Oxford, England.

The Ramblings of a Knitting Goddess

I knit. I laugh. I dream.

CaptainAwkward.com

Don't need to be cool to be kind.

Learning to Speak

An Expression of Faith

Inside the PH

Learning to Live Inside the Pastor's House

Peace, Love & Fashion

I am Anne & I Blog Fashion

Sweet And Crumby

Baking, a Love Story