joyeux cuisine

a blog about good food, family, friends, and life.

mini corn dogs.

Summer is winding down and I’m still trying to wrap my brain around the fact that I didn’t actually have a summer break. College seems so far gone, but it was only a few years ago! This year was the first year I actually had to work through the summer. The year after college I was unemployed until July, and last year I didn’t work from May until October with the wedding and moving about 3 times. Therefore, I’m not super used to being an adult.

Which brings us to corn dogs! I love corn dogs. Who doesn’t love corn dogs? Okay…I do know of a few people who do not love corn dogs. They don’t even like corn dogs. Let’s not talk about it. Corn dogs are great. And surprisingly easy to make! I am a big fan of this recipe.

I bought some cornmeal awhile back for some reason that I cannot remember. Probably cornbread to go with chili or some sort of reason like that. Anyway, this was the perfect thing to introduce me to using cornmeal. Perfect.

Usually we only get all beef hot dogs, but the first time we made these they did not taste right. We decided that corn dogs should be made with regular-who-knows-what’s-in-them-hotdogs. I cut them in half to make them mini. The first time I made these I used wooden skewers. They were a little long, but after I used lollipop sticks I decided that skewers are better. That way the sticks don’t get coated in oil and you have more control over the whole frying part. That makes me feel better about being around hot oil.

I hope you have a wonderful holiday weekend! Enjoy summer while it’s here for a little while longer. To be honest, I’m really ready for fall. I cannot wait until the weather cools down a little and the leaves turn. But summer is still here and I’ll enjoy it while it is! And that will definitely include corn dogs.

Happy cooking, friends!

Mini Corn Dogs
recipe from damndelicious
feeds 2-4 people

6 hot dogs, cut in half
1/2 cup flour
1/2 cup yellow cornmeal
2 Tablespoons sugar
2 teaspoons baking powder
salt and pepper to taste
1/2 cup milk
1 large egg
12 skewers or lollipop sticks
oil for frying, I used canola

Fill a medium sized pot about 2/3 of the way with oil. Heat over medium-high heat while prepping the corn dogs.
In a small bowl mix together the flour, cornmeal, sugar, baking powder, salt, and pepper. In a large measuring bowl mix together the milk and egg. Add the dry ingredients to the wet ingredients and mix until fairly smooth. Set aside.
Dry the hot dogs off with a paper towel so the batter will stick better. Insert a skewer about halfway into the hot dog. Dip in batter, insuring that the hot dogs are completely covered.
Fry 4 corn dogs at one time for about 5-6 minutes or until the batter is golden brown on all around. Remove from oil onto a plate lined with paper towels to help drain some of the oil. Sprinkle with salt after frying. Repeat with remaining hot dogs.
Serve immediately with your favorite toppings.

2 Comments »

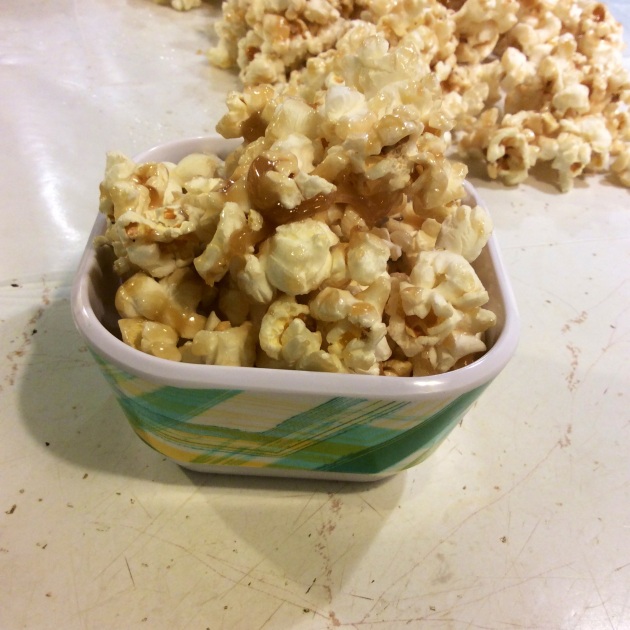
caramel corn.

My dad makes really delicious treats for us. Most notably Chex Mix, coffee cake, and caramel corn. I have fond memories of my dad getting out the giant paper bags, popping a whole bunch of popcorn and whipping up some caramel corn. It was a good time in our house those days. This recipe is not my dad’s but it is just as delicious. Okay, maybe a tiny bit less delicious; dad knows best.


This recipe came from the pastor’s wife of the church I attended in Illinois during the last few years I was there during and after college. (Thanks, Cathy!!) Whenever I go back to visit, Cathy, my best friend Bethany, and I make caramel corn and talk until way past our bedtimes. Which is what Bethany and I did when she was here visiting last weekend. It’s kind of our thing. That and watching Parks and Rec nonstop.


Summer is almost over but I’m hanging on as much as I can. Caramel corn makes me think of stress-free days and breaks from classes. I hope it brings you good memories too!


Happy cooking, friends!

Caramel Corn
makes about 5 cups

5 cups popped popcorn
1/4 cup butter
1/3 cup brown sugar
1 and 1/2 tablespoons light corn syrup

Spread about 12 inches of wax paper out onto the counter. Spray lightly with non-stick spray.
Pour the popped popcorn into a large bowl.
In a small saucepan combine butter, brown sugar, and corn syrup. Stirring constantly bring to a full rolling boil and boil for 1 minute. Immediately pour onto the popcorn and fold the popcorn until all of it is covered in caramel. Spread into a somewhat even layer onto the wax paper. Eat immediately or wait until cool.
Store in plastic zip top bags once cool.

Leave a comment »

chicken and noodle casserole.

Ever since I got married I’ve been trying to figure out good recipes for two people. Most of the recipes out there are for families of four or more. So we usually have leftovers forever. And I have never been a big fan of leftovers. Sorry, Mom.

That’s where casseroles come in. I’ve found that it’s nice to not have leftovers, but also to make a freezer meal at the same time. Almost every recipe calling for a 9×13 pan can be put into two 9×9 square pans instead. I like to make two pans and freeze one. It makes life a lot easier. I like easy life, even if it’s only for a night.


This casserole is perfect for anytime you’re wishing for cold winter months. That would be today for me, but I know I’ll be dreaming of summer months in December. It’s a trade off in the Midwest. We deal with it.

I love pasta and I love chicken. So this is a good casserole to serve that love. You know what else I love? Crushed buttery round crackers mixed with more butter and browned to perfection on top of…well…anything really.


This casserole calls for cooked chicken cut into pieces. I like to boil a chicken breast in chicken stock with a few seasonings, but to make it even easier you can buy a rotisserie chicken and cut that into pieces. Whatever you please will be wonderful. Cook some egg noodles, throw everything into a bowl, stir it all together, call it a day.


Happy cooking, friends!

Chicken and Noodle Casserole
makes 1 9×9 pan

1 cup chicken, cooked and chopped
8 ounces egg noodles, cooked according to directions
1 can cream of chicken soup
1 cup sour cream
1 cup shredded cheddar cheese
1 tube crushed buttery-round crackers
1 and 1/2 tablespoons butter, melted

Preheat the oven to 350 degrees, grease a 9×9 square pan and set aside. Combine the chicken, noodles, cream of chicken soup, sour cream, and cheese in a large bowl. Mix until everything is coated in soup and sour cream. Pour into the 9×9 pan. Mix the crushed crackers and melted butter until the mixture is crumbly. Cover the top of the chicken and noodles with crackers.
Bake at 350 for 30 minutes or until the top is golden brown.
This can also be frozen: Do all the steps until baking. Cover well with a lid or plastic wrap and foil. Freeze. Thaw completely before baking.
Leftovers should be stored in the refrigerator for up to a week.

2 Comments »

baked double chocolate donuts.

Every Saturday morning for the last few months I make my husband some donuts. It started as the biscuits in a can donuts that you fry up and cover in sugar. Then I turned into baked donuts after I found a recipe for apple cider donuts and had to buy a donut pan. We haven’t looked back since.

For a long time with donuts I would find a recipe somewhere and make that, decided whether or not Zack liked it and then do a different recipe the next Saturday until I found one he liked. That got a little tedious so I eventually settled one what texture was good and what icing was good. My dear husband doesn’t love frositing because they are usually way too sweet. This glaze is perfect. (To be honest, I didn’t really even measure.) And I just got conformation that these are the best donuts I have ever made. He’s so nice to me.


Someday I’m going to have to get another donut pan. Six spots just isn’t enough sometimes. Especially when you’ve got a donut loving husband.

This batter is pretty much a cake batter that you make into donuts. Which makes the donuts really moist and dense. I like a dense donut. It comes together like a muffin batter; you mix the dry together, you mix the wet together, you mix the wet into the dry. Easy as donuts.


Happy cooking, friends!

Baked Double Chocolate Donuts
recipe from use real butter
makes about 14 donuts

for the donuts:
2 cups flour
1/2 cup unsweetened cocoa powder
2 teaspoon baking soda
1/2 teaspoon salt
1 cup buttermilk*
1 cup brown sugar, packed
2 eggs
6 Tablespoons unsalted butter, melted and cooled slightly
2 teaspoons vanilla extract

for the glaze:
1 and 1/4 cup powdered sugar
3 heaping tablespoons cocoa powder
1/8 teaspoon salt
4-5 Tablespoons milk
1 1/2 teaspoons vanilla extract

To make the donuts:
Preheat the oven to 325 degrees. Spray donut pans with non-stick spray and set aside. In a large bowl whisk together the flour, cocoa powder, baking powder, and salt. In a medium bowl whisk together the buttermilk, brown sugar, eggs, melted butter, and vanilla. Dump the wet ingredients onto the dry ingredients and stir with a spatula until well combined and most of the clumps are gone. Try not to stir too long or the donuts will be too gummy and tough. Pour the batter into a large gallon sized plastic bag and cut the tip off. Pipe the batter into the prepared donut pan about 2/3 full. Bake for 10-11 minutes or until the tops of the donuts spring back when poked. Cool in the pan for a few minutes and then move to a cooling rack with wax paper underneath.

To make the glaze:
In a small bowl whisk together the powdered sugar, cocoa powder, salt and vanilla extract. Add the milk and whisk until the glaze is loose. Dip the donuts into the glaze and place back on the the cooling rack. Add sprinkles immediately after glazing or they’ll just bounce off the hardened glaze. (Don’t be like me. I did that.)

You can either leave the glaze to set or eat right away.
Store leftover donuts in an airtight container and they’ll keep for about two days.

*If you don’t have any buttermilk, fear not! Add one tablespoon of either vinegar or lemon juice to a 1 cup measuring cup. Add enough milk to equal one cup and stir gently. Let sit for 5 minutes to let the milk curdle slightly.

2 Comments »

root beer float fudge.

Happy 4th of July, everyone!

I hope your three day weekend (or regular two day for some of us) has gotten off to a fantastic start! I thought I’d give you all a little recipe perfect for a party or barbecue this weekend. This fudge recipe is pretty easy and is very similar to the birthday cake fudge I made many moons ago. Also, it’s VERY sweet! You’ve been warned.

photo 2

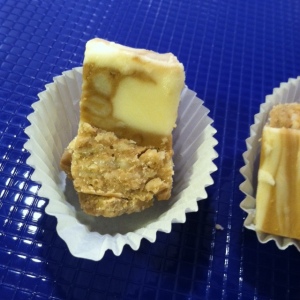
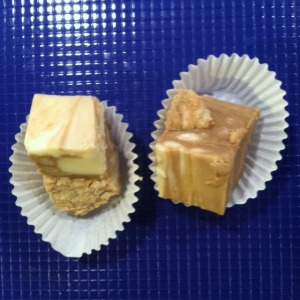
This week was the last week for a couple guys at work so we had a food day and everyone could bring in different foods to share with everyone else. I use this opportunity to stuff everyone with sugar. And I mean really. Once I brought cupcakes, the next time brownies, and this time fudge. Crazy good, wonderfully sugary, super tasty fudge.

The key to this fudge is the root beer concentrate. Everyone at work flipped out about and said it tasted exactly like a root beer float. You can almost taste the carbonation. I had many people come up to me and ask for the recipe or say the fudge tasted like a root beer float. It’s safe to say my ego grew a little bit. But it’s all thanks to this fudge. So please have a great weekend celebrating our great country.

photo 1

Happy cooking, friends!

Root Beer Float Fudge
makes approximately 40 pieces
recipe from taste of home

3 cups sugar
3/4 cup butter (1 1/2 sticks)
5 ounce can evaporated milk
12 ounce bag white chocolate chips
7 ounce jar marshmallow fluff
2 teaspoons root beer float concentrate
1/2 teaspoon vanilla extract

Line a 9×9 square pan with aluminum foil and spray generously with non-stick spray.
In a medium sized pot combine the sugar, butter, and evaporated milk. Bring the mixture to a boil over medium heat, gently stirring constantly. This will take about 5-6 minutes. Once the mixture comes to a boil, stir constantly for four minutes. After the four minutes are up remove the pan from the heat and stir in the white chocolate and marshmallow fluff. After this point you need to work really quickly because the fudge will set up pretty quickly. Pour a generous 1/3 of the mixture into a small bowl. Stir the vanilla extract into the smaller portion and stir the root beer float concentrate into the larger portion. Pour the root beer fudge into the prepared pan and spread into a flat layer. Pour the vanilla fudge on top of the root beer fudge and spread over the top.
Store in the fridge until fudge is set. Cut into 1 inch pieces and serve.
Fudge can be stored in the fridge or at room temperature, well wrapped both places.

2 Comments »

hello again with rhubarb bars

Oh, hey there, Internet friends. It’s been awhile huh?
So lots of things have happened lately and I mostly forgot that I had a blog…that’s cool right? My last post was about being engaged and trying to plan a wedding but that wedding has come and gone…about a year ago. So let’s recap.

I moved back to Iowa from Illinois. I left my jobs, packed up my stuff, and headed outta there. Leaving many a great friend behind. Thankfully there’s Skype!

I got married! I went from Joy Matthews to Joy Byard and it was a extremely wonderful day. I felt so full of love and so loved, not just by Zack, but by everyone there. I wish we could time travel there now. It was perfect.
Here’s some highlights:

Zack+Joy-56  Zack+Joy-252   Zack+Joy-162  

(MANY MANY thanks to our spectacular photographer Cymone Wilder!!)
Then. My brother got married! A mere 20 days after Zack and I! (Mom cried a lot last June) I got to be a bridesmaid and that was also a really great day. We partied in a barn after they got married and it was cool. Stephanie looked beautiful and Ian looked okay too. (Also, today is their anniversary! Happy anniversary you crazy kids!)

Next. I was unemployed for awhile in Des Moines while Zack had time off from school. So I did a lot of knitting, reading, Netflix watching, and general laying around. Seriously, I read Gone Girl in one day. We also moved to a new apartment in July and then I had to leave for a week to go play in a musical in Illinois. Gotta love Les Mis.

Finally. I got a job though a temp agency and now am full time! I am so thankful for that. It’s been a pretty sweet gig so far. Our department is fairly small and we have food days sometimes, so I still get to flex my baking muscle for people there. I’ve made banana bread so often for everyone. And cupcakes and brownies. I like to think I’m pretty liked there for my food skills.

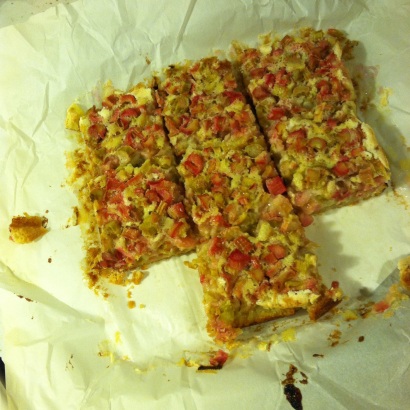
And now here we are. That’s really the highlights of the past long while. Married life is hard, but really worth it. I really enjoy having someone to make food for that really appreciates it. And that’s where the rhubarb bars come in!
Zack loves rhubarb. Me? No thank you. So I literally cannot tell you how these taste. I’ve tried so many times to like rhubarb but I can’t. Zack however said they were delicious and ate two and then said I was the ‘bestest bestest best.’ So I think they’re pretty good.

2015/06/img_1627.jpg

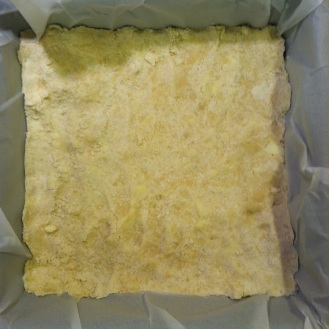
They’re also really easy. You mix up the crust with a pastry cutter (is that what’s that thing is called??) and bake that and then make the topping. It’s pretty easy and turns out really well. They look really good too which is always a bonus.

2015/06/img_1629.jpg

Happy cooking, friends!

Rhubarb Bars
recipe from garnish with lemon
makes 9 bars

crust ingredients:
1 cup flour
1/3 cup powdered/confectioner’s sugar
1/2 cup (1 stick) of very cold butter cut into small cubes

topping ingredients:
2 eggs
1 1/4 cup sugar
1/4 cup flour
1/2 teaspoon salt
3 1/3 cups roughly chopped rhubarb

Preheat the oven to 350 degrees.
For the crust: combine the flour and powdered sugar in a medium sized bowl. With a pastry cutter, cut in the butter to the flour and sugar until the mixture is crumbly and looks similar to sand. Spread into a greased or parchment papered 8×8 square pan and press down with the backs of your fingers. Bake for 15 minutes.
For the topping: lightly beat the eggs in a medium sized bowl. Add the flour, sugar, and salt and stir until well combined. Fold in the chopped rhubarb until all the rhubarb is covered in the egg mixture. Pour the rhubarb over the crust as soon as the 15 minutes are up and return to the oven for 30-40 minutes or until the topping mixture doesn’t move when you shake the pan. (Mine was a little jiggly still, but my taster said it was delicious anyway.)
Cool the bars completely before removing from the pan and cutting into squares.
Store cut bars in an airtight container at room temperature.

Leave a comment »

blueberry coffee cake.

When I was growing up my dad made the best coffee cake. Sometimes the person to do all the baking in the family is the mom. But in my family both my parents like creating things in the kitchen. It’s been one of the highlights of my upbringing. In addition to coffee cake my dad makes super awesome caramel corn, Chex mix, no bake cookies, blueberry crisp, and he can pretty much grill anything you ask him to. There is no shortage of delicious food in my parent’s house. And I am so blessed by it.

My mom also supplies me with delicious ingredients for things. For example: she bought a 5-pound box of blueberries last weekend for my brother and I to share. Brother gave me the whole box, so now I have blueberries forever until he comes to claim some (which I’m hoping is never). It’s hard to figure out what to do with a large box of blueberries though, so don’t be surprised if you see lots of posts about blueberries over the next couple months. Although, half of them are going in the freezer to save for the cold winter months when I just want blueberry muffins.

This recipe turned out way better than expected. I found it online and tweaked it a little bit to change the flavors up, and it was spectacular. This is one of those foods that you can eat for breakfast or dessert or a snack in the middle of the afternoon. Which makes it even better. This also gave me an excuse to make homemade whipped cream…so bonus. The original recipe didn’t have any vanilla extract in it so I added a teaspoon of that as well as half a teaspoon of almond extract because those two flavors together really bring out the complexities of the other. I also added a little cinnamon and nutmeg to the cake part to bump up the flavor. Then I added an extra quarter cup of milk making the cake really moist. And finally I added an extra tablespoon of butter to the topping which melted in the oven and settled into the cake increasing the moist-ness even more. Worth it.

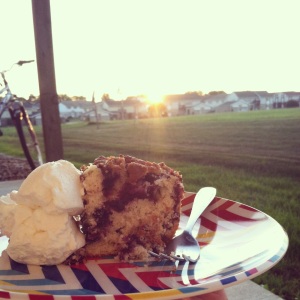
I ate my first piece of this with 3 large dollops of whipped cream while watching the sun set. It was glorious.

IMG_1182Make some coffee cake. Eat some whipped cream. Watch the sunset. Be friendly.

Blueberry Coffee Cake
adapted from allrecpies.com
makes 1 9×9 pan

1/4 cup (4 Tablespoons) butter, softened
3/4 cup white sugar
1 egg
1 teaspoon vanilla extract
1/2  teaspoon almond extract
3/4  cup milk
2 cups flour
2 teaspoons baking powder
½ teaspoon salt
Pinch of nutmeg and cinnamon
2 heaping cups fresh blueberries

For the topping:
1/2 cup brown sugar
3 Tablespoons flour
1 teaspoon ground cinnamon
1/2 cup chopped pecans
4 Tablespoons butter, cubed

Preheat the oven to 375°. Butter and flour a 9 inch baking pan and set aside.
In a small bowl combine the flour, baking powder, salt, cinnamon, and nutmeg. Stir to incorporate them.
In the bowl of an electric mixer cream the butter and sugar until light and fluffy. Add egg and extracts and beat for another minute. Add flour and milk alternately starting and ending with flour. Gently fold in blueberries and pour into prepared pan.
In a small bowl combine brown sugar, flour, cinnamon, and pecans. Using your fingers, mix in the butter cubes until a sand-type consistency is reached. Spread over the top of the coffee cake.
Bake for 40-45 minutes or until you can insert a toothpick into the center and have it come out clean. Cool slightly. Serve warm topped with homemade whipped cream or ice cream.

Store at room temperature in an airtight container.

Leave a comment »

double cookie dough ice cream.

I’ve made homemade ice cream exactly one time. And it wasn’t great. It was pretty mediocre, so I haven’t been super excited about making ice cream again. It’s also kinda stressful and time consuming, so it’s not always on the top of my list of things to do. This place is often reserved for things like showering, eating food, or something that should just be automatic for normal people. But I found this recipe on Pinterest a few weeks ago and decided that I would treat myself to making it. Also, my boyfriend was visiting and he loves ice cream with cookie dough in it. So I figured why not.

The thing about this ice cream is that it isn’t just vanilla ice cream with cookie dough chunks in it. It’s freaking cookie dough flavored ice cream with cookie dough chunks in it. MIND. BLOWN. I didn’t quite believe that it was possible until I tested it while it was churning. Guys. It’s possible. It’s even delicious without the cookie dough chunks. (At this point I’m seeing how many times I can use ‘chunk’ in one paragraph.)

I also listened to Alton Brown’s podcast this morning (find it on iTunes because it’s awesome) and being almost a week behind it was all about ice cream which was fantastic. Alton Brown is one of my favorite food personalities, so his podcast is one of my favorites right now. So much food nerdy-ness. So awesome.

The really important thing in this recipe is the browned butter which adds the nutty cookie dough flavor to the ice cream. There’s also two kinds of milk fats which makes the ice cream ice cream. And there’s egg yolks which makes this ice cream almost like a custard. In my opinion, that’s better than just milk based ice cream. The thing with egg yolks is making sure you don’t actually cook them. When it’s time to add the hot butter and cream to the egg yolks and brown sugar you have to temper it. That means adding a little bit at a time to gradually bring the egg yolks up to temperature. That will ensure that the egg yolks won’t cook. It’s easy, don’t worry.

Make some ice cream. Share with dear friends. Be a nerd. Enjoy your summer.

Double Cookie Dough Ice Cream
recipe from beantownbaker
makes about 1 quart

for the cookie dough:
5 Tablespoons butter, melted
1/4 teaspoons salt
1/3 cup brown sugar
1/4 cup flour
1/2 teaspoon vanilla extract
1/2 cup mini chocolate chips

Combine the melted butter, salt, and brown sugar in a bowl with a spatula until creamy. Stir in the flour until a dough forms. Add vanilla. Add chocolate chips and combine. Turn onto a sheet of plastic wrap and form into a rectangle. Store in the refrigerator.

for the ice cream:
3 Tablespoons butter
2 cups heavy cream
2/3 cup brown sugar
4 large egg yolks
1/8 teaspoon salt
2 teaspoons vanilla extract
1 and 1/2 cups whole milk

In a medium sized saucepan melt the butter over medium heat. After the butter melts it will begin to bubble and crack. The butter will start to brown and begin smelling nutty. Keep an eye on it because it can burn really quickly. When the butter is browned add the cream and whisk well to combine. Bring the mixture to a simmer.
In a medium sized bowl combine the brown sugar, egg yolks, and salt. Whisk together to combine. When the cream and butter mixture is at a simmer, add a couple tablespoons to the egg mixture and whisk constantly. Keep whisking and slowly add more cream to the egg mixture. Eventually you’ll add a little under half the cream. Add the egg mixture back into the saucepan and put over medium-low heat. Stir the mixture constantly until it thickens enough to coat the back of a metal spoon. This took me about 10-15 minutes. Be patient.
Strain the mixture into a heat-proof bowl and stir in the whole milk and vanilla. Place in the fridge until chilled (for best results chill overnight).
Freeze in your ice cream maker according to the manufacturer’s instructions. Chop the cookie dough into small pieces. Transfer chilled ice cream into air-tight container for freezer storage and mix in cookie dough pieces. Freeze until firm.
Ice cream will keep in the freezer for 1-2 months.

Leave a comment »

an update. finally.

Okay everyone. I’m still here. It’s been quite a long time since I posted last, so I figured I would give you a little update about what’s been happening over the last couple months since obviously, I haven’t been keeping up well with this whole blogging thing.  My bad.

May was full of excitement about finally graduating and starting life in the real world. It was really exciting because I got an apartment with my friend and I’d been working on organizing and job hunting and everything like that. May very quickly turned into June which was no good because I still didn’t have a job at all and had no prospects. Of all the job applications I turned in, exactly none of them contacted me at all about interviews or anything. Very discouraging. I did get to spend a lot of weekends traveling to Michigan to see my boyfriend, which was awesome because long distance relationships suck.

In June I finally heard from one of the job applications I turned in and got an interview and subsequent job at a grocery store in town in the bake shop. Pretty exciting because I kinda like baking and all that stuff. So I started my new job about halfway through June and it’s been a really interesting experience. Everyone has been very encouraging and helpful but I always feel like I’m bothering everyone with all my questions about where things are and if we have specific things and all that stuff. I am very thankful for this job, even though it is very tiring sometimes. I do really like it.

June also very quickly turned into July and with that came rent payments and I finally broke down one day and realized that I couldn’t pay my rent. (Guys. Real life is fricken’ hard.) So I called my loving mother and told her that I needed help. She graciously lent me money so I could actually pay my rent and everything was okay again. I also haven’t had any money to buy ingredients to bake with and often just eat pasta or other boring things for meals and you don’t want to read a blog about that. Hence the no blogging thing. I now also have a second job with my alma mater working with the marching band, which is very exciting. I am really excited to still have that family of crazy marching band people around me. I’m doing purely administrative work and it will be very fun.

There have been many weeks where I feel like I’m failing adulthood and that I don’t have a purpose here and all those things. But as those around me say it’s a lot harder than it looks. Life doesn’t fall right into place like you want it to. You have to work at it and no, you cannot just sit in your room and watch Netflix all day. (Unless it’s your day off. Then I say go for it.) I’m still learning how this living thing actually works. Taking care of yourself is hard work, but I’m assuming it’s worth it in the end. I hope you stick with me to hear about all the adventures I’m having and about the new lessons life is teaching me. There will be cookies. And a pretty good soundtrack.

1 Comment »

homemade granola bars.

Sometimes you have half a canister of oats because you made oatmeal cookies forever ago. Sometimes you also have almonds because your mom bought you a 9 pound bag of them. Sometimes you also have one and a half jars of honey because you found one in your pantry while you were moving. If you’re lucky you also have chocolate chips and coconut because you’re addicted to them. When the stars align and you possess all these ingredients it’s time to make granola bars. Better than store-bought granola bars.

Friends, there are so many granola bar recipes out there that it’s hard to sift through. Some of them have weird ingredients like wheat germ and flax seeds, but I didn’t want to have to buy anything for this recipe. I made it with things that were all in my pantry, which I call a huge success.

Granola bars are one of those things that you can make your own really easily. Dried fruit? Sure! You hate coconut? Alright. Raisins? Totally. Extra chocolate chips? Now you’re speaking my language. You can do whatever you want to make these just like you want them to.

The original recipe comes from The Sisters Cafe. I adapted it a little bit because theirs calls for krispy rice cereal, but I don’t have any so I just used some lightly crushed corn cereal squares that I’ve been meaning to make puppy chow out of. Next time I’m just going to omit them entirely though. I also added some almonds because I love chocolate and almond together. I also baked mine in a 9×9 pan instead of an 8×8 and it worked out fine. I would bake them a little longer than the time suggested though. I also toasted my coconut to bring out all the amazing flavors.

Make some granola bars. Take a road trip. Drive with the windows down and radio blasting. And then look for more jobs.

Granola Bars
adapted from The Sisters Cafe
makes 10 granola bars

2 and 1/2 cups old fashioned oats
1/4 cup coconut
1/2 cup milk chocolate chips
1/4 cup almonds, roughly chopped
1/2 cup brown sugar
1/2 teaspoon salt
1/2 cup butter, softened
1/4 cup honey
1/2 teaspoon vanilla

Preheat the oven to 350 degrees. Line a cookie sheet with aluminum foil and place the coconut over that. Bake for 5-7 minutes until the edges get golden brown. Keep an eye on it though, because it can burn really quickly. Remove and cool slightly. Leave the oven on. Butter an 8×8 or 9×9 pan.
In a large bowl combine the butter, honey, brown sugar, salt, and vanilla. Mix until combined. Add the oats, coconut, almonds, and chocolate chips and stir until everything is coated. Smoosh (technical term) into the buttered pan and bake for 20 minutes. Cool in the pan completely before cutting.
When cool cut into 10 bars and wrap each one individually in plastic wrap. Store in a cool place.

Leave a comment »

CreativeWhimsy

A blog about one person's creative attempts

"Give a girl an education..."

The random musings of a traveler turned grad student.

Katina's Adventures Abroad

Follow my journey in Oxford, England.

The Ramblings of a Knitting Goddess

I knit. I laugh. I dream.

CaptainAwkward.com

Don't need to be cool to be kind.

Learning to Speak

An Expression of Faith

Inside the PH

Learning to Live Inside the Pastor's House

Peace, Love & Fashion

I am Anne & I Blog Fashion

Sweet And Crumby

Baking, a Love Story